Thursday, January 31, 2013

"Baltimore Rhapsody" Block #19 - the conductor...


What is the orchestra without someone in charge?  This is the final block for this orchestral quilt, but there will be more music blocks to come (don't fret if you have not seen your favorite yet).


The conductor not only "keeps the beat" and keeps everyone together, but also studies the musical score so much that it is memorized.  This can be literally thousands of measures of music, and keeps "the score in his head - not his head in the score" so that he/she is free to make eye contact with the musicians and draw every possible drop of expression from the performance.


While a conductor probably plays at least one instrument, he/she knows much about all the instruments.  They must also be physically fit...take a pencil, hold your arm out at shoulder level, and try to direct through a song on the radio...it is not easy!


Most orchestra and band conductors use a baton (stick) in one hand.  It is an expressive extension of the hand, and makes crisp and/or sweeping movements that are easily seen and interpreted by the musicians.  The other hand is used to control dynamics, etc (and pull up pants, if necessary, LOL).

At some point, I want to make this block, with the pants bunched around the ankles and humorous boxer shorts revealed (or a tattoo, LOL).  Can you tell I grew up watching a lot of Bugs Bunny and Loony Tunes cartoons?!?  (including the "Rabbit of Seville" and Wagner's "Kill de Wabbit")

Choral directors usually don't use a baton, as voices are easier to mold and direct expressively with hands.


In addition to studying and memorizing many scores for each concert, the conductor is always searching out new music.  


To conduct is to be more than just being a two-legged metronome, more than just an indication of tempo...the whole body is used to interpret the music through baton flourishes, body positions, and facial expressions.  It can seem like an interpretive dance.


The conductor can take certain liberties with tempo and dynamics, and can emphasize instruments and musical motifs as he/she likes.  This is why listening to two different conductors recording the same piece of music can be so interesting and different.


In the past, great conductors were composers as well.  Until the early 1800's, they might be the concert master or harpsichord player, directing while playing.  

The level of conducting difficulty depends on the kind of musical work being performed.  Operas and ballets may be the most difficult - not only does the conductor direct the orchestral musicians, but has to be concerned with singers, actors, soloists, and dancers.  

To conduct a ballet, the conductor must have a sense of "muscle memory" that allows a piece of music to be conducted at the same tempo each time.  This way the dancer has no surprises!


The tuxedo worn by the conductor is usually all black, but I chose a dark gray for the pants so that the coat and pants wouldn't meld into some sort of bizarre musical jumpsuit.


Most of the famous conductors of the 20th century were older men, with stylish, gray hair.  I chose to make my conductor youthful, with the kind of face, hair (and body) that could cause a young, impressionable, female woodwind player to miss entrances due to staring and swooning (guilty...).


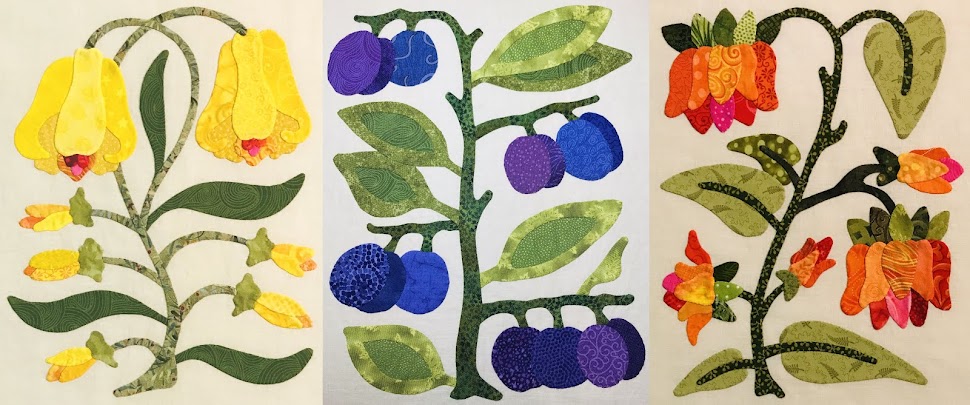
This is probably not the final block arrangement, but it is fun to see them all together, and I wanted to see what they would look like with no sashing, which is a popular setting in antique Baltimore album quilts.  The setting and outer borders are my next concern.


If you would like to read more about this project, read here.  Now that all the blocks are done (so that GOOD photography can be done), it won't be long until the block patterns will be available for purchase.  Stay tuned!  (ha-ha...get it?!?  "tuned"?!?)

In stitches,
Teresa   :
o)

Sunday, January 27, 2013

Rejection, squaring up blocks, and the "big picture"...


Well, I always knew that I couldn't put every music block in the first quilt of this Baltimore Rhapsody project, but I am disappointed to exclude these three from my first quilt.  When I first envisioned the "symphony" quilt, I was going to put the viola in the same block as the violin, one on each side of the fruit compote, etc.  I was also not going to include the piano or timpani. 

Then, there is the last block I am working on right now...how could I not include it (as soon as I finish it, I will post it - it is so FUN!).

Now I see these three with a fourth block (doodled in my noodle...).  Then they will make a nice wall hanging.

I couldn't wait to finish the current block to square them up and start messing around with the arrangement of the sixteen blocks.  So now that I finished all the embroidery, it's time to trim and have a partial reveal.

When it all boils down, I mostly wanted to see the monster all together.


The ruler on the right has been very useful on this project.  It is made by Omnigrid and measures 15 inches square.  The Creative Grids ruler on the left is new and was especially designed to square up this size block.  It measures 15-1/2 inches square...PERFECT!


The blocks have had a final pressing, and I carefully, carefully trimmed away the excess background.  "Measure twice, cut once" is certainly appropriate in this case.


The new ruler made quick work, and I have a pile of blocks ready to be pinned to my design wall.


My strategy consists of arranging the blocks, considering color, which way the block "leans," and spreading out the various degrees of heaviness. THEN I STAND BACK AND SQUINT.  The squinting is key for me. 


Every time I moved blocks around, I took a picture so that I could reproduce that arrangement, if needed.


For the next picture, I inserted my unfinished block...mostly to get rid of the hideously ugly and old pink college blanket that is used for the design wall in the quilt cave.


I'm sure I will move them around some more.  I am making various sashing and border pieces, so it was time to have the blocks up on the wall so I could audition sashing strips and fabrics where I can see the whole thing.

The quilt is not this dark...my indoor photography needs a lot of help, mostly a better camera, I think.  It is really gratifying to see them all (mostly) and continue the planning.

In stitches,
Teresa  :o)

p.s.  I was openly WEEPING tonight after Downton Abbey, Season 3, Episode 4.  Spoiler alert: someone dies.  OMG!  I AM STILL CRYING...

Saturday, January 26, 2013

"Baltimore Rhapsody" - the final block tweaking...

Before tweaking...

More tweaking...I usually don't mind detail work, but even I am ready to MOVE ON and GET ON WITH THINGS.  Before trimming the blocks down, the last outline stitching to highlight all the tedious hand-applique was needed.

Kerry of SimpleBirdApplique was asking about why I do this.  Simply stated, some applique motifs didn't pass the "squint test."  If I put the finished block on my design wall, stand back, squint my eyes, and lose part of the design, that is a signal to me that something must be done.

After tweaking...

After tweaking...

After tweaking...

All of the woodwind blocks have light-colored keys.  When they spill over onto the light background, they simply don't "speak," they melt into the background.  This is especially true with the flute where the keys are basically the same color as the instrument.

Before tweaking...

I even carefully used a different, darker fabric for the body of the flute to emphasize the keys.  Then when I finished, pinned the block to the design wall, stood back and squinted...nothing.  There still was not enough contrast...bummer.

Before tweaking...

After tweaking...

I needed definition, not a cartoon finish, so I used a single strand of DMC embroidery floss in a gray that was darker than the flute.  I do a simple outline stitch with one strand (where the stitches don't overlap, but touch end-to-end.  Using black would have maybe looked comical.
After tweaking...

After tweaking...

 The outline stitching even helps some of the flower pieces.

After tweaking...

Before tweaking...

Even on the clarinet and oboe blocks, where the body of the instrument is black, the lighter, metal keys just look like a mash of gray.

Before tweaking...

Before tweaking...

I outlined the keys in black only where the keys overlap...I did not stitch where the gray met black...the black fabric provided the needed contrast. 

After tweaking...

I did choose black floss for the clarinet and oboe keys...for some reason it didn't seem so cartoon-ish on these instruments.

Before tweaking...

After tweaking...

On the piano block, I painstakingly drew a multi-petaled blossom, picked out a graded selection of reds for the petal pieces, and after all this STILL ended up with a flower that looked like it was made from one fabric when I did the squint test.  Ouch!

Before tweaking...

And on the piano legs, I carefully chose two different brown fabrics to depict the different edges and highlight the perspective.  When I squinted, the legs looked like they were made from the same fabric.

Before tweaking...

Just a little outline stitching using a slightly darker red floss helped tremendously...

After tweaking...

 ...and a little dark brown stitching helped to define the piano legs.

After tweaking...

I had already outlined where "parts" met "parts" on the trumpet, which helped, but then I lost the whole trumpet on the background.

Before tweaking...

After tweaking...

(Can you tell I pinned the block to a black background for the photo?  You can see where I trimmed away behind the trumpet bell. That won't be so obvious when the block is against a light colored batting/backing.)

I went back and outlined the rest of the instrument with the same medium brown and I like the result.
After tweaking...

The viola pears before...there's a pattern here...can you see it?  Maybe this is why people don't use much bright yellow in applique. It is perfect on a dark background, but is totally lost in the cream.

Before tweaking...

After tweaking...

Just a little dark gold helped so much.

I had already outlined all the petals on the double bass block daffodils to help emphasize the blossom details (and the fact that I had used so many fabrics)... 

Before tweaking...

...but the light green stems disappeared when squinting.

After tweaking...
 Same thing with the bottom of the lime...

After tweaking...

And the double bass needed the same definition between the top of the instrument and the side as the three smaller stringed instruments.

After tweaking...

And FINALLY, squinting at the cello block revealed an empty space that would draw the eye in the final quilt (when all the text wouldn't be showing, LOL).

Before fixing...

I decided that I needed to add a huge, mutant butterfly.  I was already making slightly smaller mutant butterflies for the timpani block.


The block still looks a little empty, but it is better.


Picky, picky, picky...but I would stare at the finished quilt and head-slap myself if I had not taken the time.

Head-slapping hurts and should be avoided at all costs.

In stitches,
Teresa   :o)