Friday, October 16, 2009

Another Civil War Bride block done (#8)...


This is the fourth block I've finished for the Civil War Bride quilt.  I am eager to start working on a groom block that I have sort of drafted from bits and pieces, here and there.  I love working on this project!

Now, I must go to bed (it is 1:30 AM!!!).

In stitches,
Teresa  :o)

Thursday, October 15, 2009

Another binding and U.F.O. bites the dust...


I got another binding U.F.O. completed...this pattern is called "BAKER'S SQUARE" and it is made with a Moda Christmas 2008 layer cake from the line called "S'Mores."  The fabric depicts an adorable snowman that looks like marshmallows on a graham cracker...too cute.

The original pattern had no outer border, but I wanted it a little larger so I added one.  Rhonda Loy, of Dexter, MI, machine-quilted it with a close, allover stipple pattern.

My quilting buddy, Ola, made my buy the kit at the end of the season (quilting peer pressure), which contained the layer cake and inner border and binding fabrics.  I am still a little freaked out by the precuts...I am normally a washer, but I didn't wash these layer cake pieces due to the nature of the pattern (I was supposed to cut the 10 inch squares in half, then sub-cut further.  I decided to cut off the pinked edges before cutting out the pieces, and reduce the size of all pieces accordingly because I was afraid my piecing would lose accuracy by trying to deal with the edges. 

Since I knocked out another U.F.O. (and possible Christmas gift), now maybe I won't feel so guilty working on a Civil War Bride block!

In stitches,
Teresa   :o)

Tuesday, October 13, 2009

More on "going rogue"...

I started talking about "going rogue" in my last post.  By that, I mean changing an idea, a pattern or going against the norm.  I've always had a tendency to do this, and I think I feel a certain amount of "quilt guilt" about it.  


This is HOME SWEET HOME from a book by the same name by Barb Adams and Alma Allen.  I finished it in early 2008.  I love every book and project these talented ladies publish, and I had every intention of doing it just like the book when I started. In fact, blocks one, two and five are exactly like they intended.  But then, the rogue-ness crept in when I started block three...I had to add my daughter flying a kite.  By block eight, I had my, then, 10-year-old daughter designing a horse for me to include (I mean, I saw the fence and naturally thought of horses - my daughter rides and she doodles pictures of horses on everything she can find).  Well, then I thought we needed apples and an apples tree to keep the horse happy, and whenever I think of happy horses I think of sunshine and rainbows!  Before long I was hopelessly lost in rogue-land.

I was even rogue-ish in my hand-quilting with every block done differently, hiding little quilting motifs everywhere I could.  What is wrong with me!  Barb and Alma's original pattern was so lovely...here is one of their interpretations from their book..


It would be more honest to design my own quilt, rather then change someone else's creativity, but I don't feel like I am artistic enough to do that or maybe I'm just "chicken" (or lazy).

I love, love, love the CIVIL WAR BRIDE QUILT and Civil War Bride Quilt blog dedicated to people working on this fabulous project. 


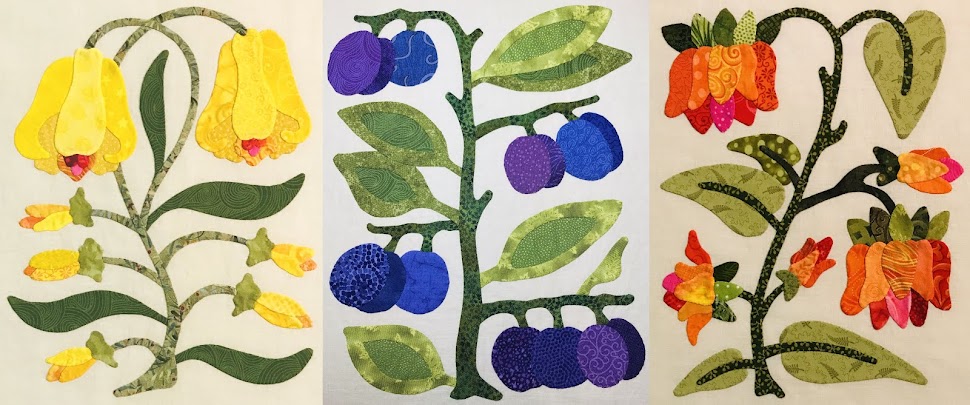
It is my favorite project right now (now if I could just clear my schedule and calendar...).  I originally thought that I would do each of the twenty blocks just like Corliss Searcey designed them in her pattern, based on the original BIRD OF PARADISE quilt top.


But then, I remembered that she had taken liberties with the original quilt top, unfinished and located in the Museum of Folk Art in New York City.  Also, I started seeing all the lovely blocks my new friends from around the world were posting as they completed them on their own Civil War Bride journeys,  Then it hit me...EVERYBODY GOES ROGUE in their own way and IT'S OK!!!!  

As the Civil War Bride quilt will ultimately be my daughter's some day...probably her wedding quilt...I am planning to go rogue on some of the blocks to make it reflect a bit of her personality (and mine).

Monday, October 12, 2009

Is it OK to "go rogue" and "get all maverick-y" ?

I used to love the expressions "going rogue" and "getting all maverick-y"...at least until all the American Presidential politics of 2008.  Maybe Sarah Palin/John McCain have ruined all that for me...

I have always looked at "going rogue" as a cute thing, as in choosing to use my Kindergarten crayons to color OUTSIDE the lines or use different colors than the norm...or maybe even turning the schematic, colorless picture over and drawing my own picture on the blank reverse side.

As a quilter, I am constantly thinking about "going rogue."  Every time I start a quilt that has been made by another quilter, or featured in a quilt book, magazine, or purchased pattern, I find I want to change something about it.  This does not mean that I don't have the highest respect for the quilter that put that particular combination of color, shape, and cotton together.  It also doesn't mean that I think I can make it better.  I think my desire comes from an over-developed sense of wanting to make the project my own...have it reflect something of my personality and preferences at this moment in time.

Let's face it...everything we do is a reflection of ourselves.  All of our quilting and craft projects are like a portfolio of out lives.  And that is always changing.  Do you cringe when you look at or think of your first quilting project??  I sure do!

I became a quilter one minute after my grandmother, ill and declining from cancer, gave me the last quilt she was able to make (in the early 80's).  I was 21-22 years old, and she had made me a GRANDMOTHER'S FLOWER GARDEN quilt using some of the flowery scraps I had left over from making summery dresses and shirts.  She had pieced the top and her friends that she quilted with in the community hand-quilted it for me.  Oh my God, you could have knocked me over with a feather!!  I decided there and then that I had to keep this wonderful tradition going in our family.


Well, I rashly decided that in honor of my grandmother, I was going to make a Grandmother's Flower Garden quilt as my first quilt!  I looked through my scraps and saw crazy, bright cotton calico and bright royal blue poly/cotton left over from making my college dorm window curtains.  (YIKES!) On your mark, get set, GO and SEW...


Well...I have not finished it.  I still have good intentions.  I mean, it is hand-pieced and the technique was pretty good for a self-taught, first effort...no English paper piecing on that sucker...I did Y-seams!!.  But the fabrics, OH MY GOD!!!  The calico fabric selection of the late 1970's/early 80's...well, it SUCKED!  I remember very few possibilities.  One little ditsy flowered calico, I had it in five, yes FIVE colorways (yellow, blue, brown, green and red).  And all the stripes, dots, and solids were leftovers from making stuffed Christmas ornaments.  That was because there were so few prints and colors to choose from.

Well, I digressed...I guess that first quilt was a reflection of my youth and personality in 1982.  Would I go off in that direction now?  I love traditional patterns, but am also drawn to the bold and whimsical.  I am sorry that I used some cotton/polyester blend fabrics in the flowers and the blue connecting fabric...on that issue, I wish I had a "do over."  When I made that first partial quilt top, my stash fit in a pillowcase...talk about your humble beginnings!  Things are not so sparse now...I think my husband wishes I had my 1982 stash now...  

In stitches,
Teresa  :o)

Thursday, October 8, 2009

Binding finished on my favorite U.F.O.!


This is BABY BUNTING...the quilt pattern was presented in pink, white, and pastel scraps a few years ago in either Quiltmaker or Quilter's Newsletter Magazine.  I knew at once from the size of the scrappy wedgies that it would be perfect for using up some small scraps.


Each of the 16 big blocks (finishing 19.75 inches square) is made up of 16 smaller block units. I both hand and machine-pieced the curved seams after chain machine piecing all the little wedgies together (I cut out all those 1280 little suckers with scissors!).


I chose the two green fabrics very carefully because I felt the need to calm down the "noise" of the scraps a bit, and I chose the white tone-on-tone background because I thought it would make the brightness of the scraps "pop."


When piecing this quilt, I always dreamed that I would hand-quilt it...that's how it ended up on the missing projects list.  But I am a woman on a mission to clean up as many U.F.O.'s as possible before 2010.  Thanks to Rhonda Loy of Dexter, Michigan for the machine-quilting.

In stitches,
Teresa  :o)

Tuesday, October 6, 2009

A boring (for some) hand-applique tutorial...

I want to respond to an "anonymous" comment from Teresa in Illinois about the "glue-stick method "of doing hand applique (I didn't see an email posted for you).  I am a novice at this technique, but have gotten some really good results using it already on blocks from the "Civil War Bride Quilt."

I learned everything about this from my friend Mary Liz (ML), but hopefully she won't mind me passing along a very crude tutorial.  I've been doing hand-applique for years by another method.  I'm taking her class at the local quilt shop next week, where I hope to learn even more fussy little details.  Perhaps then I will work up a tutorial to add to this blog.  I'm finding the technique very liberating, and maybe others will as well.  I'm on a crusade to make the word "applique" cease to be a dirty word!

MATERIALS:
* freezer paper
* glue stick (there are MANY out there - "Elmer's Washable Glue-Stick-Disappearing Purple" - ML likes these because they aren't too sticky, they are cheap, easy to find, and the temporary purple color helps you see where you've glued.  There are more expensive ones, made by quilting folks like Fons and Porter, but the Elmer's works great for me.)
* toothpicks, a stiletto, or bamboo skewer(s)
* plastic square ruler, piece of template plastic, or piece of plexiglass (the glue washes off easily, won't hurt ruler)
* iron
* assorted scissors (paper, fabric, and small snips that are sharp to the point)
* Roxanne's Glue Baste (other washable glues may work)
* light box, or flip-up Ott Light and piece of glass or plexiglass
* needle and thread - use a slender, long, sharp needle like a straw needle and silk or cotton thread


1.  After tracing applique shape on the non-shiny surface of the freezer paper, cut the paper tracing out on your tracing line with paper scissors.  Iron this to the RIGHT side of the fabric (your applique won't be reversed with this method).  Using fabric scissors, cut out shape leaving a 1/8 inch allowance.  After cutting out, I press again to make sure the freezer paper is well-adhered to the fabric...I don't want it flopping around while I'm gluing.

2.   Snipping not quite to the paper, put little cuts in the glue-under allowance to ease inside curves or inside corners.  It's hard to see in this picture, but I made 2 little snips in the side inner curve of this pear.


3.  Working on your plastic ruler or piece of plastic, apply glue to a small area at a time, just on the edge.(I like to work from "snip to snip").  The disappearing purple color comes in handy here.  Make sure to replace glue stick cap after gluing...they dry out fast!  ("Click" on the picture below to enlarge so you can see the glue!)  Remember, you are gluing on the wrong side of the fabric - the right side has freezer paper stuck to it.  The paper will be your guide for turning under.


4.   Using a toothpick, stiletto, skewer or fingers, fold the allowance over to the wrong side, making tiny pleats when necessary, poking with implements or pressing with fingers to stick.  The glue allows you to pull up an area, if needed, to re-position.  I don't press really hard until I'm happy with my curve/side.


5.   When I get through with the shape, I turn it over on the work surface and press all the way around with my fingers.

6.   Important:  The pear shape that I used in the pictures above stands alone - no part of it is under another piece.  That means it was OK for me to glue under the allowance all the way around.  The edges that are tucked under other pieces remain not turned under.  Sometimes, when cutting out the shape, I allow a little more "allowance" for these not-turned-under edges.  If I am unit building, I can trim excess allowance away before adhering the unit to the background.

7.   After preparing all pieces, it's time to lay them out.  I use a light box, or my opened-up Ott light, laying on its back under a piece of plexiglass to facilitate this.  I lightly masking-tape my pattern to the clear surface, center my pressed, untrimmed background over it, lightly making-taped (ML likes to starch the background slightly), then peel off the freezer paper to the pieces and lay them out on the background.

8.   Because I sometimes cut away behind my hand-applique, I tend to build small units of the whole picture.  I like to use Roxanne's Glue Baste to layer pieces and adhere to the background for sewing.  It takes very little glue.  Like my buddy Ola would say, "dot, dot, not a lot."  By this she means, tiny little dots of glue, about the size of small pin heads, spaced out.  I usually put these tiny dots of glue on the glued-under allowance.  It holds REALLY well, and it is much easier to soak/wash out after stitching (before trimming up) if you have not over glued.

9.   Here is an example of how I build small units.  In this picture of a flower with leaves from one of my Civil War Bride blocks, first I would applique the purple center on the yellow flower, then, using the pattern as my guide, I would tuck the leaves under, secure each with 2-3 tiny dots of Roxanne's Glue Baste, allow to dry (it's fast!), then applique to the flower.  I trim the tucked-under leaf (raw edge), if necessary, then I move on to building the next "unit."

10.   I use silk thread for hand-applique once everything is lightly glued down...it is slippery thread (like sewing with human hair!), but I love the end result (the stitches melt into your work and are hard to detect).  If you use more traditional thread, match the color to the piece, not the background.

11.   After everything is stitched down, I soak the block in a small tub of cool water, agitating and replacing water now and then.  Be careful here if you might have a fabric that is not colorfast!  When I use a light background, I can usually see the white dots of glue baste throught the wet back.  I soak, hand agitate, and change water until I don't see the dots of glue anymore.  Then I roll the piece up in a small towel and squeeze (not wring!) to remove most of the water. Then I place a dry towel on my pressing surface, lay out my block right-side-down, smooth it out until it looks square, then press gently with a hot iron to mostly dry the block.

12.   Now I trim/square up my block.

Ta-da!!  Not bad, huh??  I felt a little awkward at first with this method, but after a little practice it gets less clumsy.

In stitches,
Teresa  :o)


Monday, October 5, 2009

Addicted to "The Civil War Bride" quilt...


Well, I have finished my third block of this quilt now, and I am totally addicted!!  It is a great project and I am totally loving the applique technique I recently learned from my quilting friend (thanks again, Mary Liz!).  I had heard of this technique (glue stick) before, but wasn't really tempted to try it because I have gotten so fast over the years with my baste-under method and I thought that the glue stick (and later glue baste) would be messy and add extra steps.

Well, the more I try the new way, the faster I am getting.  I am finding flaws in my technique and fixing them (like making sure I soak the completed block long enough to dissolve the glue before pressing it dry and trimming - and making sure I change the water in the container a couple of times and aggitate gently with my hand).

I'm looking forward to Mary Liz's class next week so that I can see what I am leaving out (...knowing me, something really important and useful!!).

All of you know that I am a "nutter" (crazy, nuts, elevator doesn't go to the penthouse...), but there are so many leaves and other things on this project that I am going to start keeping a running tally of things I applique down as I go.  Here is my list after 3 completed blocks:

   leaves - 95
   pieces of fruit - 9
   flowers/buds - 23

 Here is the picture of the whole quilt (from the pattern).


There are 20 total blocks in this quilt, plus the awesome borders.  I have already decided to leave a block out so that I can insert a groom block of my own design.  But which one to leave out and how to re-arrange the remaining blocks so that things are balanced?  This has been puzzling me, and now I came up with a tool to help me decide!

I made a color copy of the picture on my computer printer, cut the blocks apart, and now I can play with the arrangement.  This is important to me as I plan colors for blocks...I want things to be balanced when I finish this long process!!


In my "spare" time, I have been planning and painstakingly cutting out a hand-piecing project to work on that is totally portable.  I love to have something mindless and easy in a big baggie right by the door so that I have something to do in meetings, while waiting for appointments, and anytime I am chauffering (and waiting for) my daughter.   :o)

Ta-da!!  Here it is...all reproduction fabrics in every color and a lovely bubblegum pink to set the large stars with after they are made.  I found the pattern in this month's "The Love of Quilting" (Fons and Porter - the one with a fall quilt on the cover).  I LOVE scrappy - no pesky fabric choices to make - I can use them ALL (although I did have to decide on a bubblegum pink for the setting squares, etc.).  All the pieces (1000+) are in a project box, and I will place a few triangles at a time in a baggie with little scissors, a thimble, thread and a needle.  I find I listen much better when my hands are busy (it keeps me from daydreaming), and since I'm happily piecing away, I'm much less hostile if the topic is controversial.  :o)


I am still progressing on binding my three latest machine-quilted U.F.O.s - maybe I can show them next time.

In stitches,
Teresa  :o)

Thursday, October 1, 2009

Getting out the fall quilts and decorations...


The temps dipped down to 34 degrees here last night and we had a light frost in southeast lower Michigan.  Seeing how it is October 1, I guess it is time to get out the Autumn-themed quilts.  This wall hanging came out of an Alex Anderson book several years ago when I was teaching a hand-applique class.


                    Fall is my favorite season - I love all the purples, oranges, golds, reds, greens, and browns together, especially the purples.


This is a sample I did for the shop this fall called "NO CROWS" by P3 Designs.  I loved how all the pumpkins were in segments so that I could use lots of different fabrics (Teresa Rule #1:  The quilt with the most fabrics wins!)


P3 Designs also came up with this wild pumpkin table runner that I did a couple of years ago...it is in desparate need of some TLHQ (tender loving hand quilting). 


I also found some fall apples that need to be quickly hand-quilted as well, along with a wall hanging I made for my best quilting buddy, Ola, for her birthday (it's called "THREE PUMPKINS AND A CROW") ...it's actually finished!  I'm putting the last quilting stitches on a Halloween wall hanging for the door.  I seem to get a lot more hand quilting done in the fall and winter...we keep the thermostat on the furnace pretty low, so it is nice to have a big project spread out in my lap for warmth.  Of course, I have to quilt around the cat (Weasley), who is drawn to quilts like a duck to a pond.


In Stitches,
Teresa  :o)


Thank you, thank you, Mary Liz!


Thank you, thank you Mary Liz for introducing me to your glue stick method of hand-applique!  I just finished block #3 from THE CIVIL WAR BRIDE (my second finished block).  I was a little nervous about dunking/soaking it in water to dissolve the glue stick and the Roxanne's Glue Baste upon finishing all the hand-stitching...but I'm a fabric washer, so there were no surprises, like fabrics running. After all that work, I would have died on the spot if colors had bled!!  I'm still going to take your class in a couple of weeks, but I'm getting more confident with each little bit I glue!  This project is so special for me and I am enjoying the online quilt group that is kind of like a little stitch group.

I should finish the binding on two quilted U.F.O.'s, then I will work on another "Bride" block.  There are so many frickin' leaves in that project!!

In stitches,
Teresa  :o)